

此篇文章是个人通过阅览Spring MVC源码的学习过程记录,包含Spring MVC的关键细节源码设计和一些设计上的tips,更近似于一种意识流的记录方式,锚点设置可能也有些乱,零零散散的点我日后有时间会统一总结起来。
Http的八种请求方式
Restful风格的Http有八种请求方式,除了最常使用的Get与Post还有Head、Put、Delete、Options、Trace、Connect。
在Restful接口的设计中,请求方方式的语义性很强,我们时常用他约束接口请求的行为,请求类型的语义:
OPTIONS获取服务器支持的HTTP请求方法;
HEAD跟get很像,但是不返回响应体信息,用于检查对象是否存在,并获取包含在响应消息头中的信息。
GET向特定的资源发出请求,得到资源。
POST向指定资源提交数据进行处理的请求,用于添加新的内容。
PUT向指定资源位置上传其最新的内容,用于修改某个内容。
DELETE请求服务器删除请求的URI所标识的资源,用于删除。
在这里暂且不谈很少用到的Trace和Connect。
数据的幂等性
多次执行相同的方法,会返回同样的结果,这时我们说方法具有幂等性,对于接口同理,进行多次重复请求后台会进行同样的操作,返回同样的结果,这个接口便具有幂等性。
设计良好的api的PUT和PATCH应是具有幂等性的,而PUSH则相反,GET需要根据具体的业务来定性。
下文中的DispatchServlet中的patch
相关继承关系
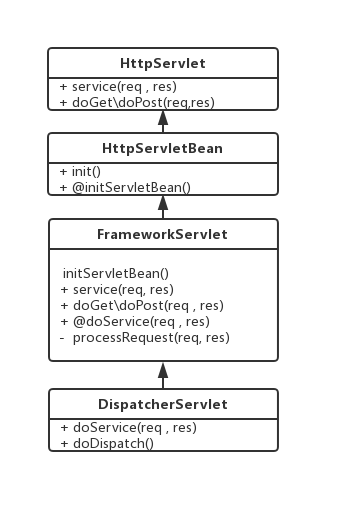
这里涉及到的处事方法广泛用到了模板方法设计模式。譬如HttpServletBean的init()中执行的initServletBean()方法定义是在HttpServletBean中,而实现是在FrameworkServlet中的。以下是相关的继承图,我已用@标识了没有定义实现细节的模板方法。
web.xml中:
<web-app>
    <servlet>
        <servlet-name>example</servlet-name>
        <servlet-class>org.springframework.web.servlet.DispatcherServlet</servlet-class>
        <load-on-startup>1</load-on-startup>
    </servlet>

    <servlet-mapping>
        <servlet-name>example</servlet-name>
        <url-pattern>/example/*</url-pattern>
    </servlet-mapping>
</web-app>
每个前端请求都对应着servlet的service方法,调用后根据请求类型(GET, HEAD, POST, PUT, PATCH, DELETE, OPTIONS, TRACE)调用对应的方法,除PATCH外的方法会转发至对应的方法中(根据HttpServlet类中的service方法),譬如doGet(),从而调用doService()方法(因为servlet请求类型中没有PATCH,所以无需多余写一个doPatch来处理它),方法中会跳转至核心方法doDispatch(),接下来逐个降价其中的一些相关代码。
FrameworkServlet
@Override
protected final void doGet(HttpServletRequest request, HttpServletResponse response)
      throws ServletException, IOException {
    //  不管是什么方法(doPost、doDelete) 重写HttpServlet的方法都是这一行代码
   processRequest(request, response);
}

/**
 * Override the parent class implementation in order to intercept PATCH requests.
 */
@Override
protected void service(HttpServletRequest request, HttpServletResponse response)
      throws ServletException, IOException {

   HttpMethod httpMethod = HttpMethod.resolve(request.getMethod());
   if (httpMethod == HttpMethod.PATCH || httpMethod == null) {
      processRequest(request, response);
   }
   else {
       //跳转到了toGet toPost等
      super.service(request, response);
   }
}
核心方法processRequest,被定义成了final的,这里面的LocaleContext存放了一些本地化的信息,而RequestAttribute是负责管理session和request的属性(Attribute)的接口,ServletRequestAttributes是它的一种具体实现。
protected final void processRequest(HttpServletRequest request, HttpServletResponse response)
      throws ServletException, IOException {

   long startTime = System.currentTimeMillis();
   Throwable failureCause = null;
        //分别获取现有的和新生成的LocaleContext
   LocaleContext previousLocaleContext = LocaleContextHolder.getLocaleContext();
   LocaleContext localeContext = buildLocaleContext(request);
         //分别获取现有的和新生成的RequestAttributes
   RequestAttributes previousAttributes = RequestContextHolder.getRequestAttributes();
   ServletRequestAttributes requestAttributes = buildRequestAttributes(request, response, previousAttributes);

   WebAsyncManager asyncManager = WebAsyncUtils.getAsyncManager(request);
   asyncManager.registerCallableInterceptor(FrameworkServlet.class.getName(), new RequestBindingInterceptor());

   initContextHolders(request, localeContext, requestAttributes);

   try {
           //方法入口 模板方法
      doService(request, response);
   }
   catch (ServletException | IOException ex) {
      failureCause = ex;
      throw ex;
   }
   catch (Throwable ex) {
      failureCause = ex;
      throw new NestedServletException("Request processing failed", ex);
   }

   finally {
       //还原原有的LocaleContext和RequestAttributes
      resetContextHolders(request, previousLocaleContext, previousAttributes);
      if (requestAttributes != null) {
          //置为不可操作
         requestAttributes.requestCompleted();
      }
      logResult(request, response, failureCause, asyncManager);
      //发布消息,是一个Event 可以被监听器监听
      publishRequestHandledEvent(request, response, startTime, failureCause);
   }
}
tip:使用监听器监听发布事件
上面方法中的publishRequestHandledEvent实现如下:
private void 取publishRequestHandledEvent(HttpServletRequest request, HttpServletResponse response,
      long startTime, @Nullable Throwable failureCause) {

   if (this.publishEvents && this.webApplicationContext != null) {
      // Whether or not we succeeded, publish an event.
      long processingTime = System.currentTimeMillis() - startTime;
      //发布Event
      this.webApplicationContext.publishEvent(
            new ServletRequestHandledEvent(this,
                  request.getRequestURI(), request.getRemoteAddr(),
                  request.getMethod(), getServletConfig().getServletName(),
                  WebUtils.getSessionId(request), getUsernameForRequest(request),
                  processingTime, failureCause, response.getStatus()));
   }
}
通过继承ApplicationListener,可以监听以上的事件:
public class Listener implements ApplicationListener<ServletRequestHandledEvent>{\
    ...
    @Override
    public void onApplicationEvent(ServletRequestHandledEvent event){
        logger.info(event.getDescription);
    }
}
tip:维持原有设计,保持逻辑结构
利用servlet的service跳跃到相应的请求方法,最后其实还是映射到processRequest方法中,这是该类的核心方法,这里之所以采用这种方式,而不是直接在service方法中将所有请求直接映射到processRequest方法,一是因为部分方法有自己的处理(如doTrace、doOptions),二也是为了良好的扩展性,如果直接将所有的请求统一处理,那么暗请求类型区分的doGet,doPost等方法将没有执行的机会。在进行功能扩展时,介于开发者不需要知道项目实现逻辑细节的原则,可能会引发种种问题(譬如继承了DispatcherServlet方法想要覆盖doPost方法作为代理预先处理请求内容,但实际上只是覆盖了HttpServlet中的方法,并且运用mvc框架时请求并没有被正确代理,因为它根本就没有通过该方法,而是被无关请求方式统一的处理了),会在造轮子系列详细解释这一点:造轮子0 浅谈设计模式-鱼鱼的博客
DispatcherServlet
@Override
protected void doService(HttpServletRequest request, HttpServletResponse response) throws Exception {
   //方法中打印request相关信息的日志
   logRequest(request);

   // Keep a snapshot of the request attributes in case of an include,
   // to be able to restore the original attributes after the include.
   //    对于include请求保留快照备份
   Map<String, Object> attributesSnapshot = null;
   if (WebUtils.isIncludeRequest(request)) {
      attributesSnapshot = new HashMap<>();
      Enumeration<?> attrNames = request.getAttributeNames();
      while (attrNames.hasMoreElements()) {
         String attrName = (String) attrNames.nextElement();
         if (this.cleanupAfterInclude || attrName.startsWith(DEFAULT_STRATEGIES_PREFIX)) {
            attributesSnapshot.put(attrName, request.getAttribute(attrName));
         }
      }
   }

   // Make framework objects available to handlers and view objects.
   //   设置一些属性,用于其他操作
   request.setAttribute(WEB_APPLICATION_CONTEXT_ATTRIBUTE, getWebApplicationContext());
   request.setAttribute(LOCALE_RESOLVER_ATTRIBUTE, this.localeResolver);
   request.setAttribute(THEME_RESOLVER_ATTRIBUTE, this.themeResolver);
   request.setAttribute(THEME_SOURCE_ATTRIBUTE, getThemeSource());

   if (this.flashMapManager != null) {
      FlashMap inputFlashMap = this.flashMapManager.retrieveAndUpdate(request, response);
      if (inputFlashMap != null) {
         request.setAttribute(INPUT_FLASH_MAP_ATTRIBUTE, Collections.unmodifiableMap(inputFlashMap));
      }
      request.setAttribute(OUTPUT_FLASH_MAP_ATTRIBUTE, new FlashMap());
      request.setAttribute(FLASH_MAP_MANAGER_ATTRIBUTE, this.flashMapManager);
   }

   try {
       //核心代码只有这一行
      doDispatch(request, response);
   }
   finally {
      if (!WebAsyncUtils.getAsyncManager(request).isConcurrentHandlingStarted()) {
         // Restore the original attribute snapshot, in case of an include.
         //include快照还原
         if (attributesSnapshot != null) {
            restoreAttributesAfterInclude(request, attributesSnapshot);
         }
      }
   }
}
这里包含了打印日志、保存快照、设置属性、doDispatch方法入口。
其中设置Context和Resolver和themeSource属性是在handler和view中使用的,而flashMap相关的属性是用于转发(Redirect)请求的参数传递。
doDispatch
doDispatch方法的代码,算是流程中最核心的代码了:
/**
 * Process the actual dispatching to the handler.
 * <p>The handler will be obtained by applying the servlet's HandlerMappings in order.
 * The HandlerAdapter will be obtained by querying the servlet's installed HandlerAdapters
 * to find the first that supports the handler class.
 * <p>All HTTP methods are handled by this method. It's up to HandlerAdapters or handlers
 * themselves to decide which methods are acceptable.
 * @param request current HTTP request
 * @param response current HTTP response
 * @throws Exception in case of any kind of processing failure
 */
protected void doDispatch(HttpServletRequest request, HttpServletResponse response) throws Exception {
   HttpServletRequest processedRequest = request;
   HandlerExecutionChain mappedHandler = null;
   boolean multipartRequestParsed = false;

   WebAsyncManager asyncManager = WebAsyncUtils.getAsyncManager(request);

   try {
      ModelAndView mv = null;
      Exception dispatchException = null;

      try {
         //如果是multipart(如文件上传),处理request,后面将通过MultipartResolver解析
         processedRequest = checkMultipart(request);
         multipartRequestParsed = (processedRequest != request);

         //请求到处理器(Controller)的映射,通过HandlerMapping进行映射
         mappedHandler = getHandler(processedRequest);
         if (mappedHandler == null) {
            noHandlerFound(processedRequest, response);
            return;
         }

         //将处理器包装成相应的适配器(从而支持多种类型的处理器)
         HandlerAdapter ha = getHandlerAdapter(mappedHandler.getHandler());

         //如果处理程序支持,处理header中包含的last-modified
         String method = request.getMethod();
         boolean isGet = "GET".equals(method);
         if (isGet || "HEAD".equals(method)) {
            long lastModified = ha.getLastModified(request, mappedHandler.getHandler());
            if (new ServletWebRequest(request, response).checkNotModified(lastModified) && isGet) {
               return;
            }
         }
         //1 拦截器预处理
         if (!mappedHandler.applyPreHandle(processedRequest, response)) {
            return;
         }

         //实际的handle调用,即进入控制层,返回ModelAndView对象
         mv = ha.handle(processedRequest, response, mappedHandler.getHandler());
         //并发情况,异步已被其他线程处理
         if (asyncManager.isConcurrentHandlingStarted()) {
            return;
         }
         //
         applyDefaultViewName(processedRequest, mv);
         //拦截器后处理
         mappedHandler.applyPostHandle(processedRequest, response, mv);
      }
      catch (Exception ex) {
         dispatchException = ex;
      }
      catch (Throwable err) {
         // As of 4.3, we're processing Errors thrown from handler methods as well,
         // making them available for @ExceptionHandler methods and other scenarios.
         dispatchException = new NestedServletException("Handler dispatch failed", err);
      }
      //渲染视图(包含对异常的处理)
      processDispatchResult(processedRequest, response, mappedHandler, mv, dispatchException);
   }
   catch (Exception ex) {
      triggerAfterCompletion(processedRequest, response, mappedHandler, ex);
   }
   catch (Throwable err) {
      triggerAfterCompletion(processedRequest, response, mappedHandler,
            new NestedServletException("Handler processing failed", err));
   }
   finally {
      if (asyncManager.isConcurrentHandlingStarted()) {
         // Instead of postHandle and afterCompletion
         if (mappedHandler != null) {
            mappedHandler.applyAfterConcurrentHandlingStarted(processedRequest, response);
         }
      }
      else {
         // Clean up any resources used by a multipart request.
         if (multipartRequestParsed) {
            cleanupMultipart(processedRequest);
         }
      }
   }
}
解析:1处是扫描拦截器的过程,在进入控制层前进行预处理,若是拦截器运行中返回false会直接按请求链返回,即下面代码中的interceptor.preHandle方法:
boolean applyPreHandle(HttpServletRequest request, HttpServletResponse response) throws Exception {
   HandlerInterceptor[] interceptors = getInterceptors();
   if (!ObjectUtils.isEmpty(interceptors)) {
      for (int i = 0; i < interceptors.length; i++) {
         HandlerInterceptor interceptor = interceptors[i];
         //执行拦截
         if (!interceptor.preHandle(request, response, this.handler)) {
            triggerAfterCompletion(request, response, null);
            return false;
         }
         this.interceptorIndex = i;
      }
   }
   return true;
}
2是WebAsyncManager中的方法,针对请求的异步处理判断时候
参考链接:芋道源码